Thursday, 31 January 2013

FAVORITE WARLI TARPA DANCE


 For the first time, I have seen stick like human figures printed on the border of a saree. I was so excited to buy that saree, but declined, as my choice had always been for cotton sarees. After sometime, I have seen the WARLI paintings, in a marriage party asa gift photo.It is so simple to draw WARLI paintings as it is like drawing circles, triangles and line joints. That's all. You can easily become a WARLI paint artist.


 This special art took its origin from state of Maharashtra in India. The people living there mixed earth and cow dung and plastered on the outer wall of the huts and painted as rich brownish- red ochre background. The rice paste had been used as paint and crushed tip of the bamboo is used as a paint brush.


 The folk stories,agricultural activities, Tarpa dance, celebrations like Diwali, Navarathiri festivals and marriages are painted on the wall. These paintings reflect their happiness and simple life. Now it has become very famous exotic art and these are used as WARLI paintings on terracotta vase, pots, Gift boxes, wall hangings etc., etc.,


 My Art teacher has taught me to do WARLI painting by using Shilpakar clay and coloured them by finishing with a coat of glue and gloss.


  For this summer vacation, when my grandchildren visit me, I have planned to teach them the art of warli paintings and I am sure that they will enjoy the Warli art world


Wednesday, 30 January 2013

DECORATED BOTTLE


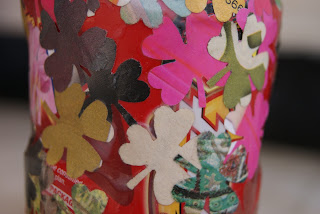
Take a flower punching machine and cut flowers in different colours. Take a plastic box and paste the flowers without a gap. This gave a very elegant look.

SMALL FLOWER VASE

I folded the papers in to length wise and rolled and pasted using fevistick. I Pasted the rolls one by one and I finish the flower vase.

PAPER BAMBOO BASKET

I  rolled long papers as much as I can. I arranged the rolls in length and breadth wise.I woven like a bamboo basket. This took me more than 7 days to complete this piece.I wish to use it as flower vase.

MIXED PAPER ROLL PEN STAND

Take a long cup and past rolled paper around the cup. I made circular rolls and pasted in bottom.

PAPER PEN STAND

Take a small tin paste with strips of paper. Top of tin I pasted a small strips irregularly. I painted lower tin with chrome yellow and light orange on the top. Pen stand is ready.

SINGLE FLOWER

I took a paper cup and made lot of slits from top to bottom. Take the slit and roll with the help of pen. I used acrylic purple colour and paint it. Later I took yellow straw cut in to small pieces and pasted them in the middle of the flower.Bottom i painted acrylic colour.

BIRD HOUSE


I took a small shoe box and then cut papers in one inch width length wise. I made lot of pieces and pasted using fevistick.I arranged the papers and did like a bird house. I had 2 birds in my hand positioned it and more happy to see the bird everyday. 

BEADED PAPER WORK


Take a magazine paper and cut in one inch width length wise. cut the paper in long triangle shape. As usual with the help of glue stick and ball point pen I rolled the paper in small beads and later pasted in a plastic box without gap.You can also use the beads for Jewell.

A SIMPLE PAPER ROLL BOX

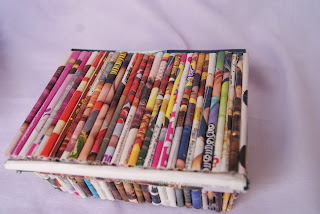
 By using fevistick and pencil I rolled  magazine papers. Then  I glued on a small box
I kept it in correct position by pasting a long piece of  transparent tape. After I got confident I removed the tape. I use this box  for keeping all my colour pens. Now I feel very comfortable.


CHICK WITH UMBRELLA

My grandchildren  got bored when they were with me for holidays  So to make their holiday in a memorable way  We all decided to do an  art work. So I was thinking for a long time as they were 6 and 7 year old children. They should be able to do and  should be easy. My grandson demanded that he want to do chick. So to do this the materials required are water, newspaper, glue and acrylic paint and the last thing a little imagination.

Take a paper  and  cut in to one inch pieces.  Sprinkle little water and make them into balls. Allow it to dry for a day. Take a chart draw a design and paste the paper roll using glue. Now I start painting the colours as my grandchildren selected. The piece is ready very simple and absolute fun to do with kids.

Wednesday, 23 January 2013

SUNFLOWER IN CLUSTER

The first lesson I learnt in oil painting is to use dark shades and slowly bring to lighter shades. This will be opposite in water painting where you would begin with light shades and end up in darkest shades. These are some exceptions also. I wanted to try sunflower in oil painting learned from my art teacher and this took me around 5 days to complete. I am happy I have learned a little about oil painting and in future wanted to try more.

SPARROWS IN OIL PAINTING

Sparrows ar disappearing I had a great love in this piece. In my younger days I can see sparrow building its nest in my house. The speciality of oil painting I didnt use orjinal colour . I took colours try to mix it to get the shade.This was a good lesson for me to learn from Oil painting.


ROSES


This was taught by art teacher. This 2 pieces took me more than 15 days. Being a beginner I did slowly. I mixed colour according to my advice of my art teacher. After finishing I was tempted to do more pieces in oil painting.

WHITE TISSUE BOX


I bought a plastic tissue box and coated with ceramic clay all sides except at the bottom. I made my beautiful flowers and glued it. Then there I gave appropirate colours. I made this for my husband to keep in his office table.


TISSUE PAPER BOX


For a long time I wanted to do a tissue paper box. At last I found an apt cardboard box and here starts my creativity. I took the box started filling it with gravels( small sand particles) and allowed it to dry for one day. I painted with green and pink colour. Top of the box I pasted bamboo sticks at a distance of one inch. I painted with pink colour. Last I gave a final coat with clear varnish. My tissue box ready...

ROSES IN A POT


With the help of tooth pick I made first bud in ceramic clay and then added petals. I allow it to dry in a sponge piece. Then I coloures in Acrylic colours. Last I gave a coat of clear varnish. I took a plastic box wrapped  with a crushed aluminium foil. I took a glossy paper and punched stars and pasted them. Inside the box I took artifical leaves and then arranged all the rose buds with the tooth pick.

DECORATIVE FLOWER POT


I had a bag of leftover white cement which should be used immediately or else it gets dried up. So I ran over and took two plastic bottles. In the mean time I mixed white cement with less water and added glue and the content was hard and immediately applied all over the plastic box. Took a bend knife and made marks all over the box. My hands started getting dried up because of the white cement. I allow to dry for a night. Next day painted with acrylic colours. The effect was eye catching.

Monday, 21 January 2013

MEHANDI DESIGN POT


 I took a Terracotta Pot, brushed to remove dirt and smooth with salt paper. Then I used 6 to 7 acrylic colours. I took each paint and gave stroke as I wished and used all colours. Last I took black paint with 0 point brush and gave mehandi designs all over the pot. Finally I gave glue and gloss coat. Seeing this all my friends praised me.

A SIMPLE VILLAGE GIRL


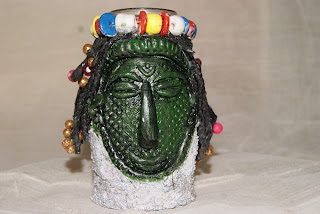
Take a PVC Pipe 6 inches and apply ceramic clay all over. For face make a thick layer and give impression by using net. Then I started doing all the features. Behind the head I braided the hair and used wooden beads to make it attractive. I painted the face with blackish green colour.